# Quickstart - Developer\_Kit
Our Developer\_Kit's enable you build custom XRP Ledger and Xahau Network monitors, blending the Internet of Things with the Internet of Value. With hands-on tutorials, open-source code, and a breadboard full of possibilities, you’ll create devices that bring blockchain to life with lights, sounds, and real-time data.
This guide walks you through unboxing your Developer\_Kit, setting up your environment, and mastering basic to advanced skills. Whether you’re a newbie or a pro, our ESP32-XRPL repository [GitHub](https://github.com/LittleLedger/ESP32-XRPL) empowers you to innovate and contribute to the XRPL/Xahau ecosystems. Let’s spark creativity and make blockchain tangible!
**What’s in the Developer\_Kit?**
Your Developer\_Kit is packed with everything you need to build a custom XRPL/Xahau monitor and learn IoT programming. Unbox these components and get ready to create:
* ESP32 Microcontroller: The brain of your projects, powering IoT and blockchain integration.
* Tactile Button: Control your device with simple presses.
* 3-Color LED (RGB): Add vibrant visual feedback.
* Buzzer: Create audio alerts for blockchain events.
* Diodes & Resistors: Ensure safe and stable circuits.
* 0.96" LCD Screen (SSD1306): Display real-time XRPL/Xahau data.
* Breadboard & Jumper Wires: Build and experiment with ease.
No kit? No worries! Our open-source tutorials work with standard ESP32 hardware, so you can follow along and innovate.
***
**Set Up Your Environment**
Let’s get your Developer\_Kit ready to roll! Follow these steps to set up your software and hardware environment.
Step 1: Install Arduino IDE
1. Download and install the Arduino IDE from [arduino.cc](https://www.arduino.cc/en/software).
2. Open the IDE and prepare to configure it for ESP32.
Step 2: Add ESP32 Board Support
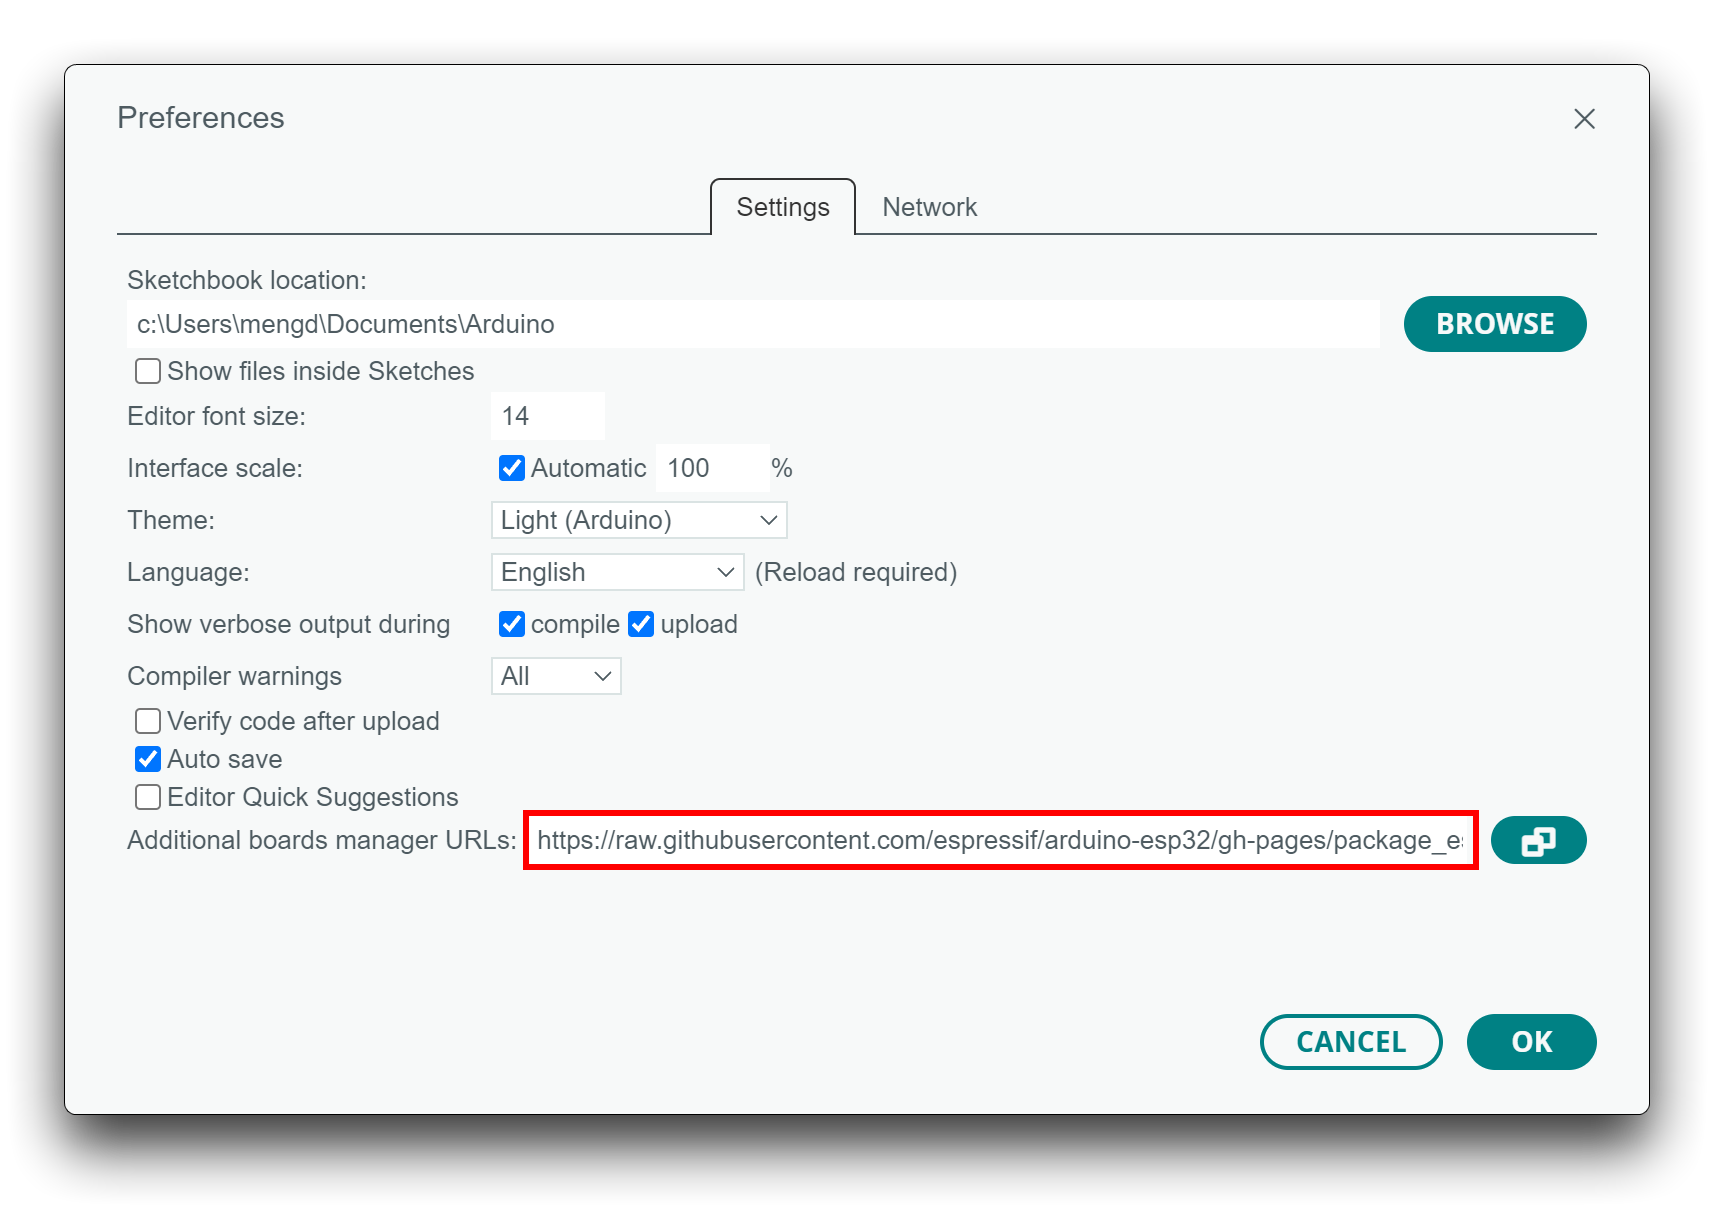
1. Go to File > Preferences.
2. In Additional Board Manager URLs add
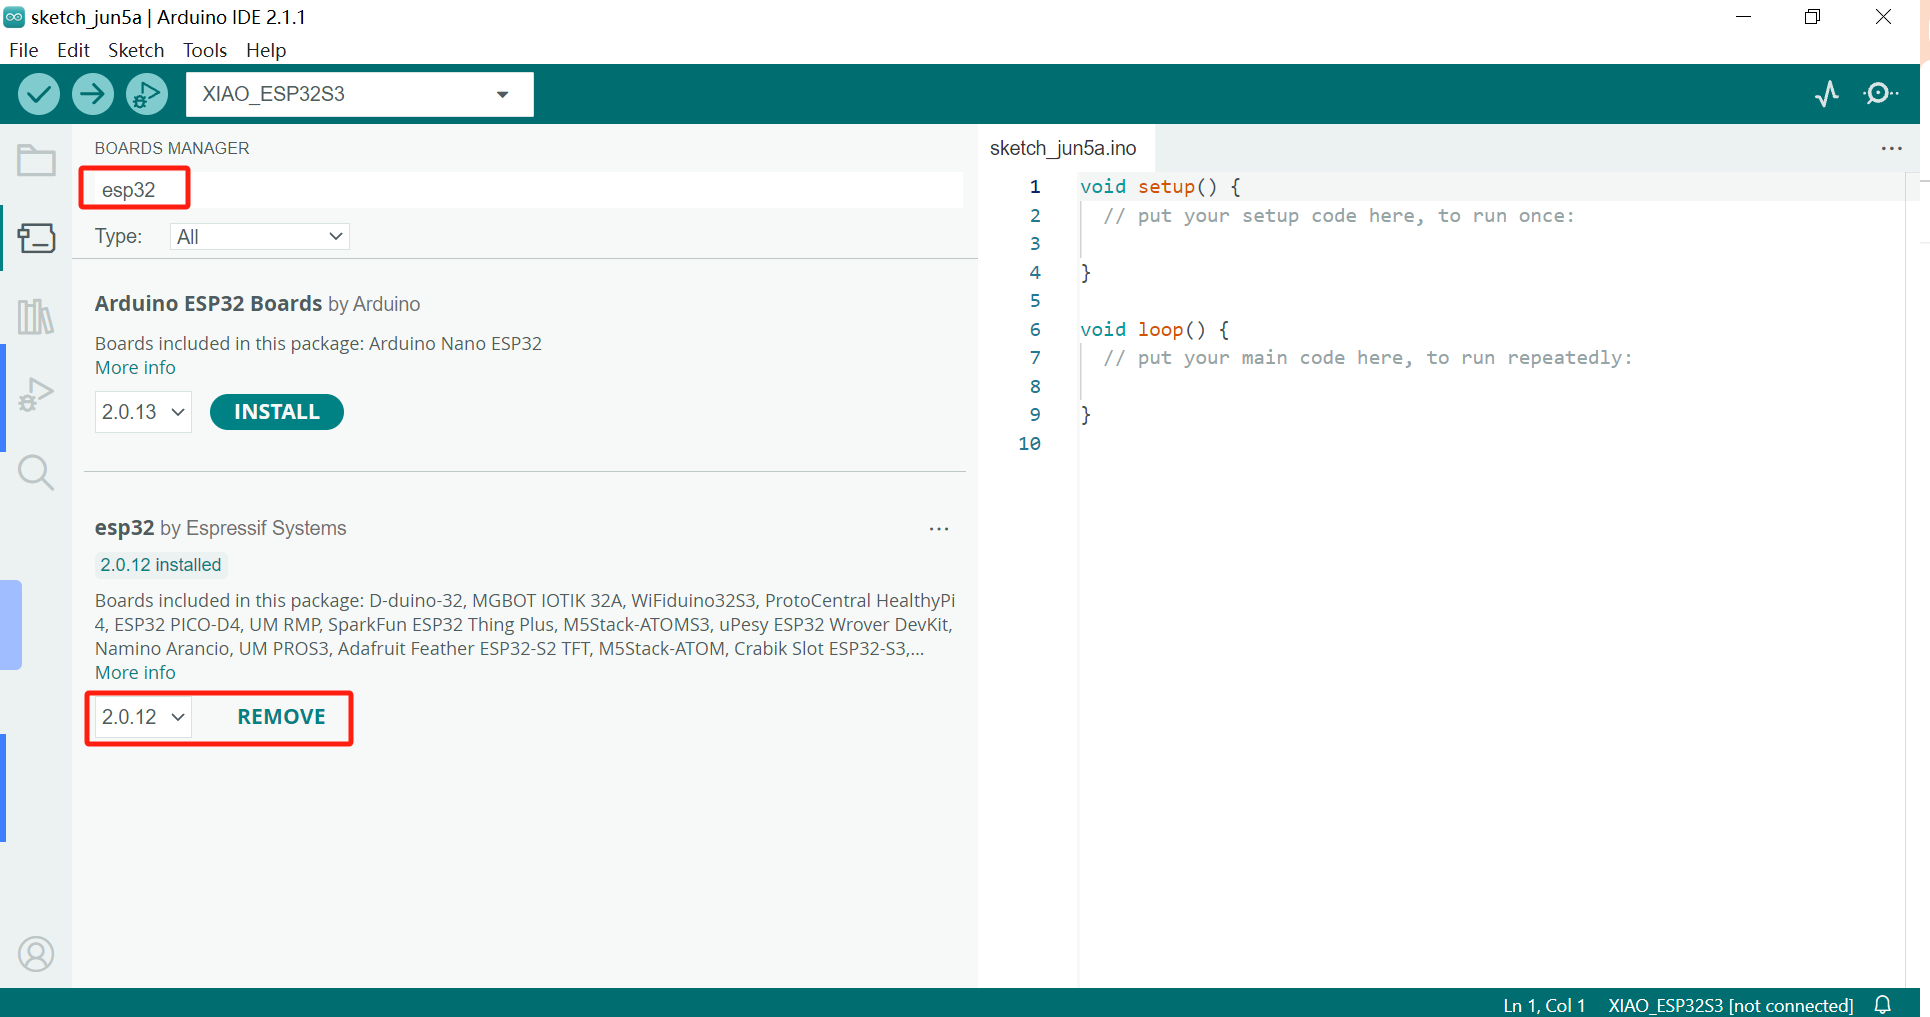
3. Navigate to Tools > Board > Boards Manager, search for “ESP32,” and install the esp32 package by Espressif Systems.
Step 3: Install Required Libraries
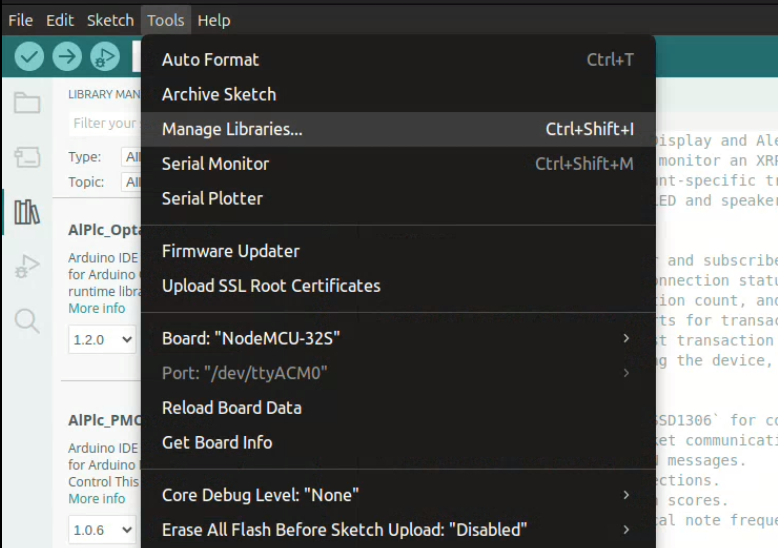
1. Go to Tools > Manage Libraries.
2. Install these libraries:
* WebSockets (by Markus Sattler)
* ArduinoJson (by Benoit Blanchon)
* Adafruit\_GFX (by Adafruit)
* Adafruit\_SSD1306 (by Adafruit)
Step 4: Install USB-to-Serial Drivers
Your ESP32 (NodeMCU-32S) needs a USB-to-serial driver to communicate with your computer. The driver depends on your OS and the ESP32’s chip (CP2102 or CH340/CH341).
* Windows:
* Install the driver for your ESP32’s chip:
* CP2102: [Silicon Labs CP2102 Driver](https://www.silabs.com/developers/usb-to-uart-bridge-vcp-drivers)
* CH340/CH341: [WCH CH340 Driver](http://www.wch.cn/engine/downloads/CH341SER_EXE.html)
* Check for a COM port in Arduino IDE under Tools > Port.
* macOS:
* CP2102: Usually built-in (Catalina+); no driver needed.
* CH340/CH341: Install from [here](https://github.com/adrianmihalko/ch340g-ch34g-ch34x-mac-os-x-driver).
* Allow the driver in System Settings > Security & Privacy if prompted.
* Look for /dev/cu.usbserial-\* in Tools > Port.
* Linux:
* Most distributions support CP2102/CH340 natively.
* Add your user to the dialout group
```
sudo usermod -a -G dialout $USER
```
* Log out and back in.
* Look for /dev/ttyUSB0 in Tools > Port.
* If the port doesn’t appear, use dmesg to troubleshoot.
Pro Tip: Use a high-quality USB cable with data lines (not power-only) to avoid connection issues.
***
### Testing - Example 01. Blink
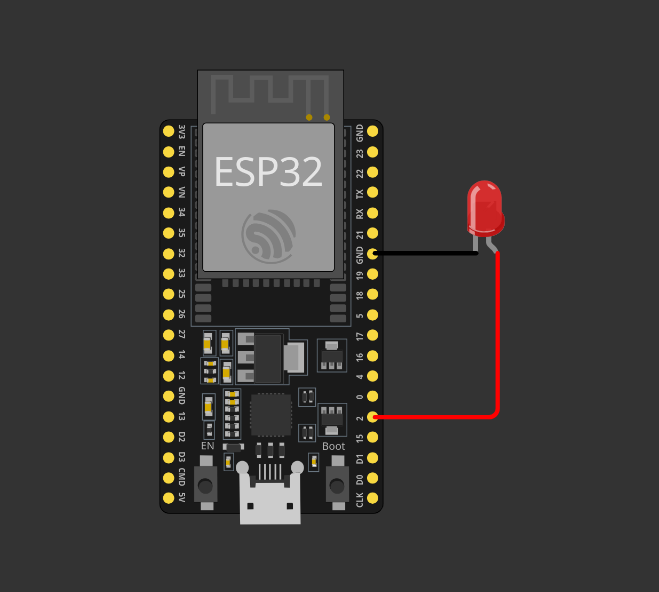
To test our setup we will connect an LED to our board and upload the blink example, the BUILTIN\_LED for our micro controller is GPIO 2 but this varies between esp32 models.
**Step 1: Connect the LED**
Connect your NodeMCU-32S to a single LED as displayed above, this can be done as pictured or by making use of the breadboard supplied. The LED ( light emitting diode ) only works one way round, the longer leg is the positive, if nothing happens after upload try swapping the connections.
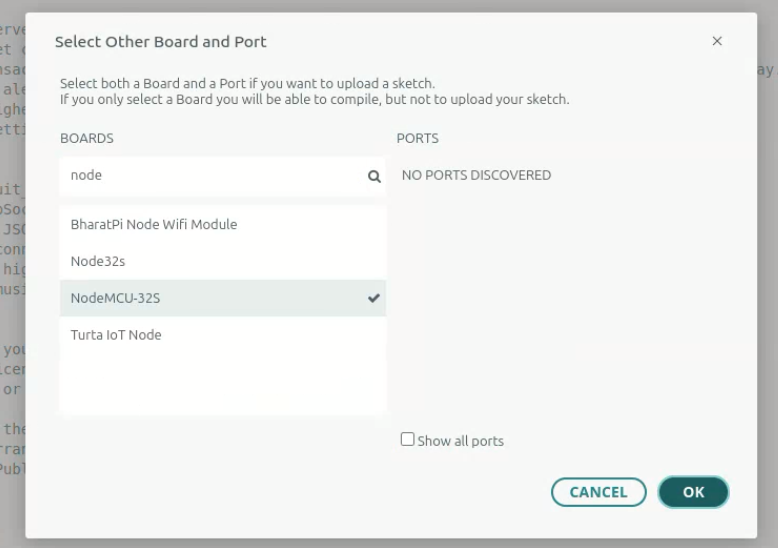
**Step 2: Assign Board NodeMCU-32S to your Port.**
Connect the ESP32 to your computer with a high-quality USB cable, open the Arduino IDE and select the "select other board and port" from the drop down next to the upload buttons (top left).
A window will appear allowing you to type in NodeMCU-32S to assign the board to your port, If the ESP32 board is not appearing try a different USB cable and double check serial ports have been configured correctly.
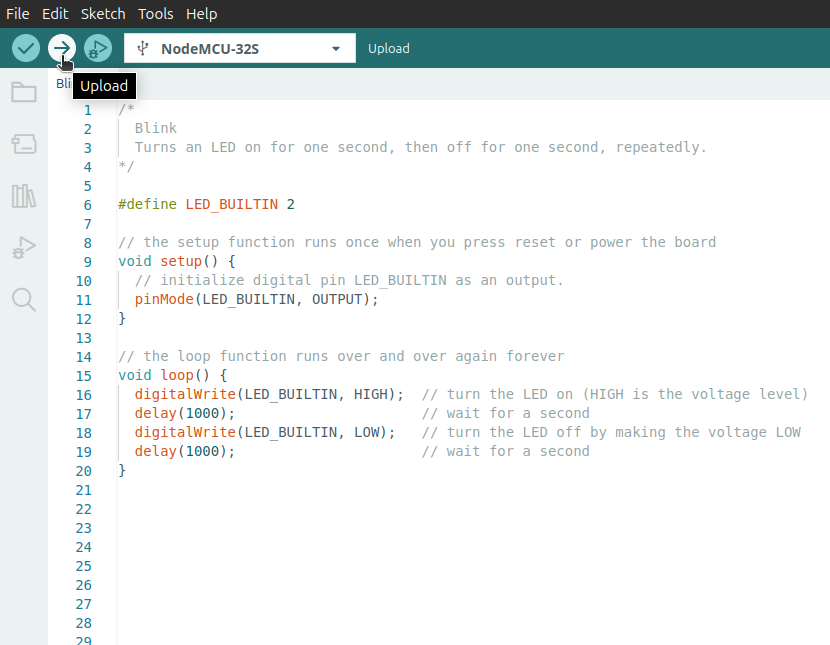
**Step 3: Blink Example**
Arduino studio is packed with examples to help you get started with any project you can think of, you can review all that is available by Selecting File > Examples. As you install more library's examples appear to here with demonstrations of how to incorporate them into your projects, we are going to select 01.Basic > Blink.
This will open a new sketch with the following code
```cpp
// the setup function runs once when you press reset or power the board
void setup() {
// initialize digital pin LED_BUILTIN as an output.
pinMode(LED_BUILTIN, OUTPUT);
}
// the loop function runs over and over again forever
void loop() {
digitalWrite(LED_BUILTIN, HIGH); // turn the LED on (HIGH is the voltage level)
delay(1000); // wait for a second
digitalWrite(LED_BUILTIN, LOW); // turn the LED off by making the voltage LOW
delay(1000); // wait for a second
}
```
Select Upload in the Arduino IDE to program the ESP32
When the upload is complete the LED connected to your ESP32 should be blinking, This confirms everything is setup correctly and you are ready to proceed to the next steps.
---
# Agent Instructions: Querying This Documentation
If you need additional information that is not directly available in this page, you can query the documentation dynamically by asking a question.
Perform an HTTP GET request on the current page URL with the `ask` query parameter:
```
GET https://xspence.gitbook.io/little_ledger/getting-started/developer_kit.md?ask=
```
The question should be specific, self-contained, and written in natural language.
The response will contain a direct answer to the question and relevant excerpts and sources from the documentation.
Use this mechanism when the answer is not explicitly present in the current page, you need clarification or additional context, or you want to retrieve related documentation sections.
.png?alt=media&token=477d88bf-78b8-43f3-8d20-1f17dccd60b4)